Introducing Pria: Your AI Study Companion
Hi, my name is Pria. I am your personal assistant, ready to help you through your learning journey.
Sometimes my name is Professor Quirk, Stinger, or anything else reflecting the brand of the university that offers my services.
Main Screen
This is the main screen where you will interact with me:

Note: The background color, logo and my personality may change based on your institution or school, but the elements of the UI are the same.
On the top toolbar, click the Pria logo to get back to this screen at any time. On the right, you can request the UI to be in Full Screen mode.

This section contains condensed information found on this page: Creating Your Digital Twin.
Interaction
Using your AI Assistant:
Input Prompt
Use the input prompt at the bottom of the page to interact with me:

To get started, simply type: “What can you do?” and press Enter.
I will stream the response onto your dialogue history page like this:

Important note: Input prompts are limited to 8,000 characters. If your prompt exceeds this limit, you’ll need to add it as a file in the MyFiles section to avoid error messages. This method allows you to work with longer prompts while maintaining system functionality. For more details on managing and using files, please refer to the ‘Files Management‘ section of the user guide.
Prompting Best Practices
To optimize your AI assistant’s responses, focus on creating prompts that are specific, provide context, and are clear. This approach ensures more accurate and relevant outputs. For a comprehensive guide on writing effective prompts, consider watching the following video:
My Response
When my response ends, Move your mouse or pointer over a dialogue to reveal a context menu for this dialogue.

For each dialogue, you can:

I can read the response using the Text to Speech controls in the context menu of each dialogue. simply click on the Play button

To customize the voice used for the text to speech function, click on the bottom hamburger menu and select Audio

Use the Audio selector page to choose the language the voice will use (e.g., en for English, es for Spanish, fr for French), then select a voice from the list of available voices in your browser. An audio sample will play the selected voice.

Click OK to close and confirm the voice you have selected. Your selection is stored in your user preferences for next time.
Speech to Text
When your device contains a microphone, and it is available to the browser, I can use the Speech to Text function to assist in writing your question. You will find the microphone icon on the left side of the Input bar on the bottom of the screen.

Select the microphone to start recording your voice.
Note: The first time, you will need to grant your browser access to your microphone. Select Allow on every visit to save your choice for next time.

The microphone icon turns green when recording is in progress. For instance, you can ask:
What can you do today?

The recorder detects that your question is finished after a long silence, and will submit your text input to me.
The response will start streaming:

To listen to my answer, click on the Play/Stop Output Audio button at the bottom of my response:
History, Left Navigation Bar, Favorites and Settings
Conversation History
Each dialogue containing your question and my answer is recorded and added into the conversion history. The conversation history has several useful buttons to help you navigate the history as well as adding or removing some dialogues to/from your list of favorites.

The following functions are available:
1. Open the side tab to navigate your conversations
2. Scroll the conversation history to the top or bottom by clicking the arrows on top or bottom
3. Click the star to add the conversation to your favorites
Marking a dialogue as a Favorite allows you to quickly go back to it when you need.
Loading more history
A menu will appear when scrolling to the top of the history list.

Click the Load Previous …. link to load additional and older history records into the list.
Left Navigation Bar
The left Navigation Bar is revealed when clicking on the tab icon on the top left side of the screen. (1)


The left Navigation Bar contains:

Zoom in and out feature and hide dialogues feature.


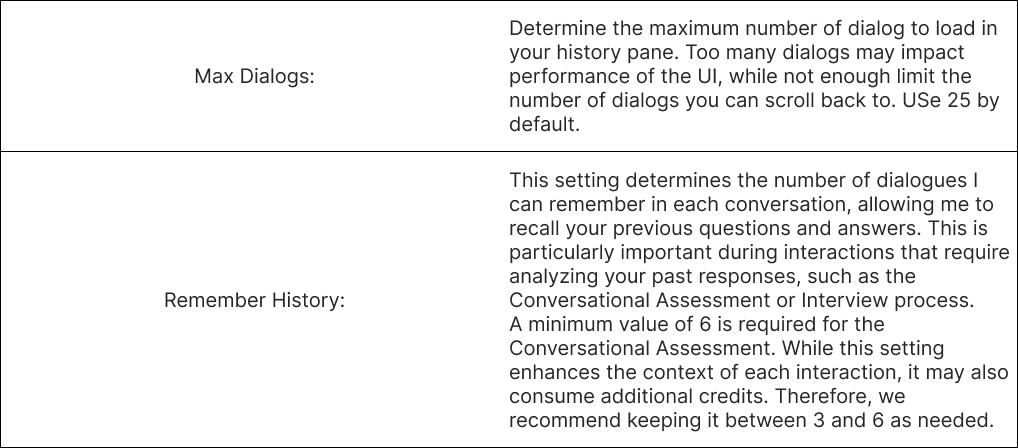
The Navigation Bar also contains features such as Max Dialogs and Remember History that allow fo
Listing only Favorites
To display only your favorite dialogs, click the Favorites icon link in the left Navigation Bar. When selected, only favorite dialogues are displayed in the conversation history.

Clicking on a favorite will help you jump directly to it.

My Settings
In the left Navigation Bar, there are additional settings on the bottom to customize your experience with me.

Sharing A Dialogue
To share a dialogue, simply get the link from the context menu by clicking on the green link like below:

The link (content) is copied onto the clipboard.

Then share it with your peers. This is what a link looks like:
https://pria.praxislxp.com/views/history/6618bc1f1d7543182e9b3133You can share this with anyone whether or not they’re registered on or logged-in to Pria.
You can also view the dialogue by clicking on the orange eye icon from the context menu

In this view, you can also copy and share the secure link to such dialogue.
Files Management
Upload Files
You can add files to a collection so that I can search and include relevant elements in my answers. To access your file list, click on ‘Add‘ and the paperclip icon.

The first time around, you will be prompted to Add a file

You can select a file from your device, or simply point to a URL to download the text content at that specific location.
I support a large variety of file types, including (but not limited to )

Click Upload File (1) or URL, then select a File (2). Use your device file manager to select an input file (in this example a docx), then click Ok in the lower-left corner.

The file is now added to the list of files to upload. Repeat adding as files as needed up to 500MB.
Click Upload (3) to start the upload process. A progress indicator will display in green below. After the files are uploaded, the process of ingestion starts and can take several minutes to complete.

When the ingestion process completes, the file status is ‘Success’

Click Done to return to the file list.
Upload Pages (URL)
Pria is equipped with the ability to scrape a web page and a given URL, extract the text and download it into your files list.
In the File Upload, click on the URL tab, then enter the URL of the web page, example:

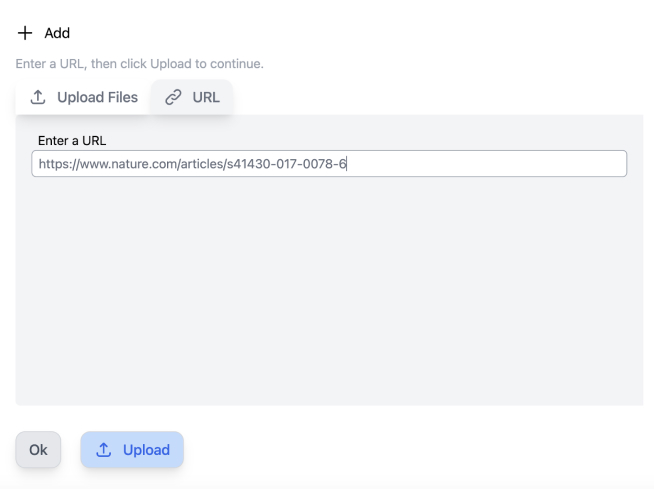
Click ‘Upload’

Click ‘OK’ to close the upload dialog. You have imported the entire content of the page at the URL

My Files
This is what the file list would look like when several files have been uploaded.

In this File List,


RAG: Search Vectors
In the file list, click on the Cube Icon, to display the Search Vectors for the selected file. These chunks contain textual elements that were ingested when the file was uploaded. I search these elements when you ask a questions using a technology call Vector Searching with the Euclidean Nearest Neighbor algorithm. It’s a little bit like the Amazon recommendations: People that buy this also buy that.
When I find relevant pieces of information from your documents, I add them to our conversation. This is a process called Retrieval Augmentation Generation (or RAG)

Click OK to close this page and return to the file list
Click the +Add button to upload additional files to the list, or for now, click OK to close the file list.

Any files you upload will appear in your conversation history, because they used credits to generate embeddings for vector search capability.

The number of files included in the conversation is displayed on the top portion of the Input text.

Did you know that you can list and address your files directly? You can ask me anything about your files, for example:
What are my files?

Files can contain text, but can also be images. In fact I am even capable of recognizing text or elements inside.
Advanced Features
LMS Integration
When configured by your institution, I can help you search for content on your LMS (Learning Management System such as Canvas, Praxis LXP, etc.). To do so, you will need to ask a question like
What are the assignments for my course?

Click the Connect to Canvas link to establish the connection with your LMS.

In the screen above, click Authorize to grant Pria access to your LMS. The screen will display the following success message:

Simply close the browser Tab to return to Pria and ask the question again:
What are the assignments for my course?

The response includes links to your Canvas LMS to access specific details about your assignments.
As an example, here is the page following the link number 2. Statistical Method, directly linked onto the Praxis’s instance of Canvas.

Conversational Assessment
As an AI Designed specifically for Education, I am equipped to offer Conversational Assessment whenever you want, and on any topic of your choice. It’s a great way to check your understanding of a topic in a “no judgment” zone. Let me be your study partner!
For the conversational assessment the topic of interests are prioritized based on
- The Classroom material
- Your file content
- Recent Interactions,
- Popular Educational and trending topics on the intern
The Conversational Assessment is a unique interactive experience designed to evaluate your knowledge and engagement on a specific topic of interest. Here’s how it works:
- Topic Selection: It starts with choosing a topic you’re interested in. This could be anything from a technical skill, a subject related to positive psychology, to trendy topics on the internet. The choice is yours!
- Question Series: Once a topic is selected, I’ll ask you a series of five diverse questions related to that topic. These questions are crafted to cover a broad spectrum of the chosen subject, aiming to assess your understanding, thoroughness, and focus.
- Scoring: Each response you provide is scored based on three criteria:
- Understanding: How well do you grasp the topic? (0-10 points)
- Thoroughness: How detailed and comprehensive is your answer? (0-10 points)
- Focus: How relevant and focused is your response to the question asked? (0-10 points) Your answers contribute to a maximum total of 150 points (5 questions x 30 points each).
- Feedback: After each question, I’ll provide a score breakdown for your response, offering insights into areas of strength and opportunities for further learning.
- Post-Assessment Summary: At the end of the assessment, you’ll receive a total score and an average grade percentage. Based on your performance, I’ll also recommend resources for further exploration on topics where you might want to deepen your knowledge.
- Memory: If you choose, your scores and insights from the assessment can be saved for future reference, helping you track your learning progress over time.
The Conversational Assessment is a great way to challenge yourself, learn more about a subject, and identify areas for growth. It’s designed to be fun, informative, engaging, and a stepping stone for further exploration and learning.
To get started ask:
Let’s start a conversational assessment!
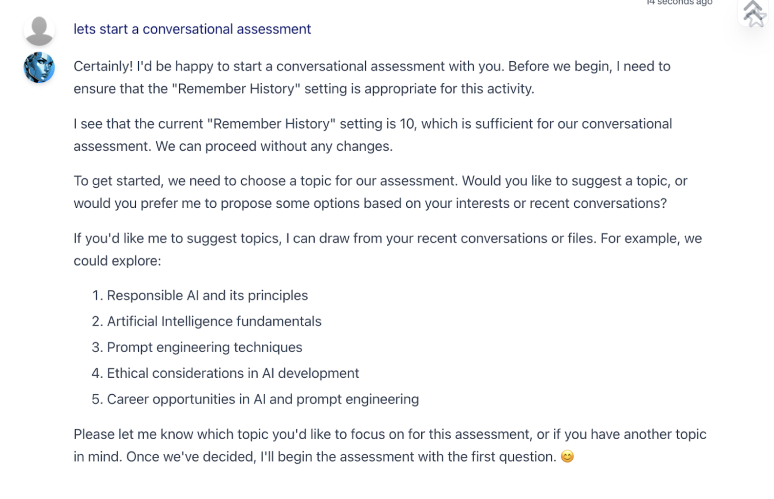
As you can see the topic listed have been prioritized based on the list above.Let’s choose “Responsible AI:”
Responsible AI

The interview is now going through the series of 5 questions. Let’s answer the first one. Enter:
In today’s technology landscape, where the world is opening its door to AI technologies, it is more important than ever to limit the risk of abuse or misuse of that technology, including but not limited to leaking and exchanging personal data without user consent.

I have evaluated your answer based on the grading rubric and prompted you to answer the next question. The assessment will continue until you answer the last question.
Questions answered with irrelevant responses or I don’t know will be treated as 0 point.


This is an example of the final answer.
